Hosting Websites with Apache and Nginx on Debian Wheezy
Ever since the “Linux From Scratch” craziness went away I’m loving to do things “the distro way”. Doing so ensures you that your configurations won’t break when you do system upgrades and thus you can do the upgrades and be always patched and as safe as possible.
Nginx is the new comer to the web server business and people seem to love it a lot. I love it myself, but sometimes you just have web apps that won’t work on nginx or web developers that did not embrace it so you need Apache to just do the job.
Ever since PHP 5.3.3 the FPM (FastCGI Process Manager) has been included so we could have PHP’s own FastCGI interface to run PHP code and serve the output to the web server. I’ve been using it with Nginx for a while, but I was never really interested in using this technology with Apache. Now it just seems fit to use it.
Let’s say that we have a server running Debian 7 Wheezy, that has two public IP addresses. Here, for the demonstration purpose I will use 192.168.216.10 and 192.168.216.11 as the public IPs. This server was just installed, with just the standard system utilities and the OpenSSH Server.
I use vim as a text editor, so one of the first things to do on our server is to install it:
apt-get install vim-nox
And for some bits of configuration vim /etc/vim/vimrc and uncomment the lines containing:
syntax on

if has("autocmd")
  au BufReadPost * if line("'\"") > 1 && line("'\"") <= line("$") | exe "normal! g'\"" | endif
endif
The first line is to ensure that the syntax will be highlighted when you open a file that has some syntax and the other lines make your editor put the cursor on the same position as it was the last time you edited the file.
We install sudo
apt-get install sudo
Than we edit the /etc/apt/sources.list and we put inside:
deb http://http.debian.net/debian wheezy main contrib non-free
deb-src http://http.debian.net/debian wheezy main contrib non-free

deb http://http.debian.net/debian wheezy-updates main contrib non-free
deb-src http://http.debian.net/debian wheezy-updates main contrib non-free

deb http://security.debian.org/ wheezy/updates main contrib non-free
deb-src http://security.debian.org/ wheezy/updates main contrib non-free

deb http://packages.dotdeb.org wheezy all
deb-src http://packages.dotdeb.org wheezy all
Notice that I also put there a non-standard repository, called dotdeb. It's basicaly a repository maintained by .... which contains always the latest stable versions of PHP, Nginx and some other software that may help you when you develop or host web pages. The next step will be to import the GPG key used to sign packages in this archive:
wget http://www.dotdeb.org/dotdeb.gpg -q -O- | apt-key add -
Our next step would be to update the repositories information and eventually update any package that might need it:
apt-get update && apt-get dist-upgrade
The next step is to install the PHP
apt-get install php5-xsl php5-xmlrpc php5-xcache php5-tidy php5-sybase php5-sqlite php5-sasl php5-rrd php5-remctl php5-redis php5-recode php5-readline php5-radius php5-pspell php5-ps php5-pinba php5-mysqlnd php5-memcache php5-mcrypt php5-imap php5-http php5-geoip php5-gd php5-gearman php5-ffmpeg php5-curl php5-cli php5-fpm
And nginx and Apache...
apt-get install nginx nginx-full apache2 apache2-mpm-worker
As a basic configuration on Apache, we make it not to listen anymore on all IPs, we edit /etc/apache2/ports.conf so it should be like this:
NameVirtualHost 192.168.216.11:80
Listen 192.168.216.11:80


    Listen 192.168.216.11:443


    Listen 192.168.216.11:443
And we also modify /etc/apache2/sites-enabled/000-default
ServerAdmin webmaster@localhost
ServerName localhost
DocumentRoot /var/www
AllowOverride None
Options +ExecCGI -MultiViews +SymLinksIfOwnerMatch
Order allow,deny
Allow from all
ErrorLog ${APACHE_LOG_DIR}/error.log
# Possible values include: debug, info, notice, warn, error, crit,
# alert, emerg.
LogLevel warn
CustomLog ${APACHE_LOG_DIR}/access.log combined
and restart the Apache web server
service apache2 restart
Then the same thing on Nginx. For that we edit /etc/nginx/sites-enabled/default and change the line containing:
listen 80 default_server;
to:
listen 192.168.216.10:80 default_server;
And restart nginx
service nginx restart
Then we check that everything it's ok:
root@wheezy:~# netstat -natpd |grep 80
tcp        0      0 192.168.216.10:80       0.0.0.0:*               LISTEN      9600/nginx
tcp        0      0 192.168.216.11:80       0.0.0.0:*               LISTEN      9412/apache2
root@wheezy:~#
From now on we will need to set passwords. In order to do that easily we install pwgen
apt-get install pwgen
We install a database engine, for this I have chosen to install MariaDB. For this we need to access Repository Configuration Tool to chose an appropriate mirror. We choose Debian, Debian 7 "Wheezy" and 5.5. Then we insert the repository and install mariadb-server:
apt-get install python-software-properties
apt-key adv --recv-keys --keyserver keyserver.ubuntu.com 0xcbcb082a1bb943db
add-apt-repository 'deb http://mirrors.linsrv.net/mariadb/repo/5.5/debian wheezy main'
sudo apt-get update
pwgen 16
sudo apt-get install mariadb-server
And we "secure" it:
mysql_secure_installation
And chose the appropriate options:
NOTE: RUNNING ALL PARTS OF THIS SCRIPT IS RECOMMENDED FOR ALL MariaDB
      SERVERS IN PRODUCTION USE!  PLEASE READ EACH STEP CAREFULLY!

In order to log into MariaDB to secure it, we'll need the current
password for the root user.  If you've just installed MariaDB, and
you haven't set the root password yet, the password will be blank,
so you should just press enter here.

Enter current password for root (enter for none):
OK, successfully used password, moving on...

Setting the root password ensures that nobody can log into the MariaDB
root user without the proper authorisation.

You already have a root password set, so you can safely answer 'n'.

Change the root password? [Y/n] n
 ... skipping.

By default, a MariaDB installation has an anonymous user, allowing anyone
to log into MariaDB without having to have a user account created for
them.  This is intended only for testing, and to make the installation
go a bit smoother.  You should remove them before moving into a
production environment.

Remove anonymous users? [Y/n] y
 ... Success!

Normally, root should only be allowed to connect from 'localhost'.  This
ensures that someone cannot guess at the root password from the network.

Disallow root login remotely? [Y/n] y
 ... Success!

By default, MariaDB comes with a database named 'test' that anyone can
access.  This is also intended only for testing, and should be removed
before moving into a production environment.

Remove test database and access to it? [Y/n] y
 - Dropping test database...
ERROR 1008 (HY000) at line 1: Can't drop database 'test'; database doesn't exist
 ... Failed!  Not critical, keep moving...
 - Removing privileges on test database...
 ... Success!

Reloading the privilege tables will ensure that all changes made so far
will take effect immediately.

Reload privilege tables now? [Y/n] y
 ... Success!

Cleaning up...

All done!  If you've completed all of the above steps, your MariaDB
installation should now be secure.

Thanks for using MariaDB!
So, the way things go every website's files reside under a different system user, under which we isolate each website's own PHP processes pool so that they could read and write on the disc only as that user. Website files should be in /home/$user/htdocs, web server log files should be in /home/$user/logs and we also need a tmp folder that holds temporary files.
cd /etc/skel/
mkdir htdocs
mkdir logs
mkdir tmp
chmod 1777 tmp
Then we add two users, for the purpose of demonstration
adduser website1
adduser website2
And we configure PHP, for that we edit the default www pool, and of course backup the original:
cd /etc/php5/fpm/pool.d
mv www.conf /root/www.conf.orig
The contents of the fie /etc/php5/fpm/pool.d/www.conf:
[www]

;prefix = /path/to/pools/$pool

user = www-data
group = www-data
listen = /var/run/php5-fpm.sock
listen.owner = www-data
listen.group = www-data
listen.mode = 0666
listen.allowed_clients = 127.0.0.1

pm = ondemand
pm.max_children = 5
pm.process_idle_timeout = 10s;
pm.max_requests = 50

;pm.status_path = /status
;ping.path = /ping
;ping.response = pong

; slowlog = logs/$pool.log.slow
; request_slowlog_timeout = 7s

; chdir = /
security.limit_extensions = .php .php3 .php4 .php5

;env[HOSTNAME] = $HOSTNAME
;env[PATH] = /usr/local/bin:/usr/bin:/bin
;env[TMP] = /tmp
;env[TMPDIR] = /tmp
;env[TEMP] = /tmp

;php_admin_value[sendmail_path] = /usr/sbin/sendmail -t -i -f www@my.domain.com
;php_flag[display_errors] = off
;php_admin_value[error_log] = /var/log/fpm-php.www.log
;php_admin_flag[log_errors] = on
;php_admin_value[memory_limit] = 32M
And than we edit website1.conf
[website1]

user = website1
group = website1
listen = /home/website1/php5-fpm.sock
listen.owner = website1
listen.group = website1
listen.mode = 0666
listen.allowed_clients = 127.0.0.1

pm = ondemand
pm.max_children = 5
pm.process_idle_timeout = 10s;
pm.max_requests = 50

pm.status_path = /status
ping.path = /ping
ping.response = pong

slowlog = /home/website1/logs/php.log.slow
request_slowlog_timeout = 7s

chdir = /home/website1/htdocs
security.limit_extensions = .php .php3 .php4 .php5

env[HOSTNAME] = $HOSTNAME
env[PATH] = /usr/bin:/bin
env[TMP] = /home/website1/tmp
env[TMPDIR] = /home/website1/tmp
env[TEMP] = /home/website1/tmp

php_flag[display_errors] = off
php_admin_value[error_log] = /home/website1/logs/fpm-php.log
php_admin_flag[log_errors] = on
php_admin_value[memory_limit] = 256M
php_admin_value[open_basedir] = /home/website/:/usr/share/pear/;
and copy website1.conf as website2.conf:
cp website1.conf website2.conf
vim website2.conf
:%s#website1#website2#gc
:x
And restart the PHP-FPM:
service php5-fpm restart
We configure vhost in nginx. For this we edit /etc/nginx/sites-enabled/website1
#
server {
        listen 192.168.216.10:80;

        root /home/website1/htdocs;
        index index.html index.htm index.php;

        server_name website1 www.website1;

        location / {
                try_files $uri $uri/ /index.html;
        }

        location ~ \.php$ {
                fastcgi_pass unix:/home/website1/php5-fpm.sock;
                include fastcgi_params;
        }

        location ~ /\.ht {
                deny all;
        }
}
Then we restart the Nginx
service nginx restart
And do the same thing with Apache, we edit /etc/apache2/sites-enabled/website2
ServerAdmin webmaster@localhost
ServerName website2
ServerAlias www.website2
DocumentRoot /home/website2/htdocs
Don't forget to install fastcgi module for apache and enable it
apt-get install libapache2-mod-fastcgi
a2enmod actions
service apache2 restart
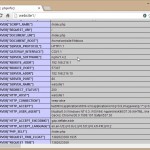
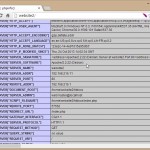
And don't forget to test. In order to do that we write on each user's htdocs folder an "index.php" file that contains:
After that we just poit our brwser to it.